The Year of Living Audaciously

Former food blog, now travel blog - following my year as a Fulbright ETA in Indonesia

  • Home
  • About Me
    • Travels and Life Updates
    • Privacy Policy
  • Fellow Fulbrighters
  • Never Skip Dessert
    • Recipes By Category
    • Recipe Index
    • The Best of the Best
    • The Social Kitchen Project
  • Recommended

Peanut Butter Cheerio Treats

July 23, 2014 by Mackenzie

Peanut Butter Cheerio Treats

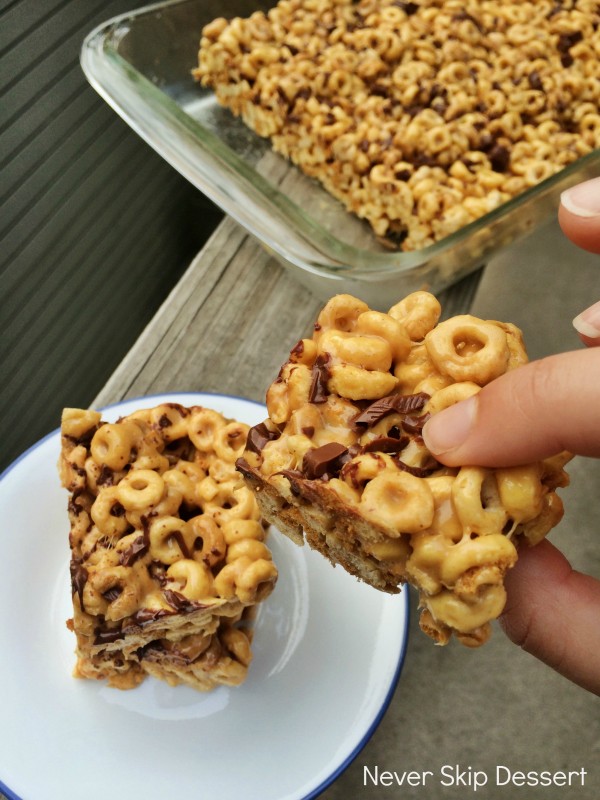
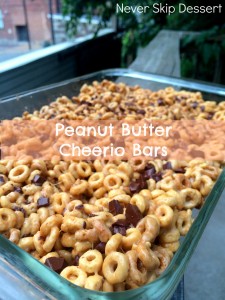
Rice Krispy Treats… always a childhood favorite! For whatever reason, I wasn’t a fan of rice krispy treats when I was growing up. It was always the post-game snack after soccer games or the summer camp go-to. But I just refused to like them. I honestly think it was because my mom loved them. Don’t you remember as a kid when your parent loved something and you just decided that you don’t like it, really just to spite them? Yeah, I’m pretty sure that was why I never liked rice krispy treats – because my mom LOVED them. Well, when I got to college and discovered our campus bakery’s rice krispy treats, all of my rice krispy treat resolutions went flying out the window. The cafes sell individually packaged, just-made rice krispy bars and they are so good. Gooey, sticky, marshmallow-y… So much better than the store-bought kind! They quickly became my go-to library study treat and at the end of the school year, when I had to finish out my meal points, I bought ten of them to bring home for my mom and I! Oh, how things change 🙂 Well, I found this recipe on Pinterest awhile back and have been dying to try it. I’m not sure what took me so long – it is the simplest recipe! It took me a whopping ten minutes to make. And seeing as I did NOT need to eat them all, and I would have if they stayed in my kitchen, I brought them in to work to share with my coworkers. They were a hit! I watched several of the staffers casually wander by for seconds and even thirds! Ha 😀 It’s a fun twist to a classic treat!


Peanut Butter Cheerio Treats

Peanut Butter Cheerio Treats
Recipe Type: Dessert
Author: Mackenzie
Serves: 28
Recipe slightly adapted from JustJennRecipes
Ingredients
  • 2 tablespoons butter
  • 3/4 cup peanut butter
  • 1 (10 oz) bag marshmallows
  • 6 cups cheerios (peanut butter cheerios, multigrain cheerios, honey nut…whatever your favorite is!)
  • 1 cup chocolate chips
Instructions
  1. Butter a 9×13 glass baking dish. In a large saucepan over medium heat, melt the butter and peanut butter. Add the marshmallows and melt them down. Just as the marshmallows dissolve into the peanut butter, pour in the cheerios and stir it all together, making sure all the cheerios are coated in the peanut butter mixture.
  2. Transfer the cheerios to the prepared baking dish and spread evenly. Sprinkle the chocolate chips over the top. Let sit for 10 minutes to set and cool and then serve!
3.2.2802

Peanut Butter Cheerio Treats

Filed Under: Bars, Desserts, Easy, Summer Tagged With: cheerios, chocolate, Desserts, Easy, fast, marshmallows, peanut butter, Rice Krispies, treats

French Lentil Salad

July 16, 2014 by Mackenzie

1IMG_6383

How can it be the middle of July already? I feel like I’m just settling into life in DC and all of a sudden I only have a few weeks left! I’m not ready to go – I’m having way too much fun!

I spent today running all over DC – attending the #MakeProgress National Summit (and hearing Senators Elizabeth Warren, Kristen Gillibrand and Chris Murphy speak!), running back to the Hill to attend a coffee with our Senator and some of our constituents, and then racing back to the conference to hear Vice President Joe Biden and Former Speaker of the House Nancy Pelosi speak.

It is days like these when I truly understand why people dedicate their lives to public service. There is much to change about the political system – yes, it can be frustratingly inefficient and unnecessairly political – but there are serious issues that must be addressed and it takes dedicated, inspired individuals to make that change happen. I’m intrigued to return to this world after graduation – I have no idea where/how but as Senator Warren said today, there is a fight that needs to be fought – she jumped in and I may too!

This week, in honor of Bastille Day on Monday (sorry the post is a few days late!), I made this French Lentil Salad! I needed a recipe with simple ingredients, that was easy to prepare and pack for lunch each day, and that filled me up and was packed with nutrition. This meal definitely fits that criteria. Lentils are an inexpensive source of protein, low in calories, and packed with fiber, iron and folate. Throw in the tomatoes and herb dressing for some flavor and you’ve got yourself a nutritious and delicious meal!

I found the recipe from a blog I’m follow called Eat, Drink and Be Skinny – yes, yes, and yes please! She has tons of healthy recipes, workout ideas (I’m doing this 30 day challenge), and lifestyle advice. Check out her site – I think you’ll enjoy it!

Comment below if you try this salad! I would love to hear what you think!

(P.S. – have you liked my new Never Skip Dessert by Mackenzie facebook page yet??!)

2IMG_6393

French Lentil Salad
Recipe slightly adapted from Sharon Palmer and EatDrinkandBeSkinny
Serves 6

Ingredients:
1 pound dried lentils
4 cups water
1 (extra large) cube vegetable broth base
4 celery stalks, diced
1 1/2 cups cherry tomatoes, halved
2 medium shallots, finely diced
1/4 cup packed chopped fresh parsley
1 1/2 tablespoons extra virgin olive oil
2 teaspoons Dijon mustard
2 tablespoons red wine vinegar
1 teaspoon herbes de Provence (or some mix of dried herbs)
Freshly ground black pepper, to taste
1 medium garlic clove, minced
1 cup croutons
Pinch of sea salt
1 bag of fresh arugula, to serve with

Directions:

1. In a medium pot, add the lentils, water and broth base. Cover and bring to a boil over medium-high heat. Reduce heat to medium and let simmer for 15-20 minutes, until the lentils are tender but firm.

2. When the lentils are done, drain the liquid and transfer to a large bowl. Let cool for 10 minutes then cover and refridgerate for at least 30 minutes.

3. Meanwhile, prepare the celery, tomatoes, shallots, and parsley and set aside. In a small dish, whisk together the olive oil, mustard, vinegar, herbes de Provence, black pepper and garlic.  When the lentils have chilled for 30 minutes or so, mix in the vegetable mixture. Next, pour the dressing over the salad and toss. Add the croutons and season with sea salt if desired. Chill until ready to serve – it’s best when it is nice and cold and even better the second day when the flavors have melded!

4. Serve over arugula, if desired.

Filed Under: Dinner, Easy, Healthy, Lunch, Salads, Sides, Summer Tagged With: celery, cherry tomatoes, Dinner, Easy, French, healthy, lentils, Lunch, parsley, Salads, shallots

Turkey and Sweet Onion Pitas with Orange-Cucumber Salad

March 16, 2014 by Mackenzie

There’s so many things I love about this dish – the sweet taste of the ground turkey, with the cinnamon, is so unique but it pairs excellently with the citrusy tang of the orange-cucumber salad. It’s healthy, with all the ingredients (except the pita) complying to the “real foods” challenge that I did last summer. One day this week I just mixed the salad into the meat and ate it without a pita – I also thought about making it into an omelete… Once it’s prepared it’s so versatile!

It’s also fast and easy to prepare and keeps well if you want to have an easily prepared meal on hand all week. I put the turkey/onion mixture in one tupperware and the salad in another and then just toasted a pita and warmed up the meat everytime I was ready to have it again. I also threw the salad on top of some spinach and served it with some sweet potatoes (next post!) for another meal. That was excellent as well – all in all, I know I will be making this often!

Comment below if you try it! I would love to hear what you think!

20140316-084040.jpg

Turkey and Sweet Onion Pitas with Orange-Cucumber Salad
Recipe adapted from Cook Fresh Winter 2014 Magazine
Serves 4

Ingredients:
2 1/2 tablespoons olive oil
1 large sweet onion, halved lengthwise and sliced 1/4-inch thick
Salt and freshly ground black pepper
1 lb ground turkey
1/2 teaspoon ground cinnamon
2 large oranges
1 small cucumber, halved lengthwise and thinly sliced
2 tablespoons red wine vinegar
1 tablespoon coarsely chopped mint
4 pita pockets, halved and lightly toasted (if you have big pita pockets than you’ll just need 2)
Plain Greek yogurt

Directions:

1. In a 12-inch skillet, heat 1 1/2 tablespoons of the oil over medium heat. Add three quarters of the onion, 1/2 teaspoon salt, and 1/8 teaspoon pepper and cook, stirring occasionally until golden brown, 8-10 minutes. With a slotted spoon, transfer the onion to a small bowl and set aside.

2. Add the turkey, cinnamon, 3/4 teaspoon salt and 1/4 teaspoon pepper to the skillet, and cook, breaking up the meat and stirring occasionally. Cook for 5-7 minutes, until cooked through. Drain well. Add the onions back in, tossing to combine.

3. Meanwhile, finely chop the remaining raw onion and transfer to a large bowl. Peel the oranges and cut the slices into bite-sized chunks, making sure to catch the juice. Add the oranges, orange juice, cucumber, vinegar, mint, and remaining 1 tablespoon oil to the large bowl; toss to combine. Season to taste with salt and pepper.

4. Fill the pitas with the turkey/onion mixture and add some of the orange-cucumber salad. Finish it off with a dollop of Greek yogurt and serve with the remaining salad on the side.

Filed Under: Dinner, Easy, Healthy, Lunch, Salads, Summer Tagged With: cucumber, Dinner, Easy, greek yogurt, ground turkey, healthy, mint, onion, orange, pitas

My Top 7 Favorite Christmas Cookies

December 5, 2013 by Mackenzie

Well, it’s been a week since Thanksgiving, the weather has turned bitterly cold, (we’re expecting our first real snow this afternoon!) and my taste buds are asking for peppermint flavored things! I’d say it’s officially the Christmas season.

To kick things off for Christmas on Never Skip Dessert, I’m pulling out some of last year’s hit Christmas cookie recipes! These are some of my favorite recipes and I will be making many batches of them in the coming weeks! (Click the cookie name or photo to go straight to the recipe! I also apologize for the poor quality of most of these photos – I’ll take new ones when I make them again this year!)

First, the ever-classic – Sugar Cookies

IMG_2574

Next, we’ve got my personal favorite – Candy Cane Cookies

20121205-133249.jpgThird, always a crowd pleaser – Spritz Cookies!

IMG_2564Fourth, for the peanut butter-chocolate lovers out there – Peanut Butter Kiss Cookies

IMG_2563Next we’ve got another classic – Gingerbread Men and Women!

IMG_2572For the coffee lovers – mocha cookies 🙂

IMG_2568And last but not least, one of my favorite holiday treats – peppermint bark!

IMG_2569I hope you try some of these out and if you do – be sure to leave me a comment and tell me how they were!

Filed Under: Christmas, Cookies, Desserts Tagged With: Christmas, Cookies, Desserts, old recipes

Deep Dish Apple Pie

May 26, 2013 by Mackenzie

http://users.erols.com/rbrwak/

Sunday was quite the day in the kitchen! Not only did we make this gnocchi in tomato vegetable sauce, this roasted beets and root vegetable salad with quinoa, homemade granola, and focaccia bread – but we also made this deep dish apple pie! And my oh my, what a pie!

I’ve made quite a few apple pies in my time. Apple pie is a staple at our Thanksgiving and it’s probably one of my favorite desserts – so I’ve made a fair amount of apple pies! However, I believe this pie has easily defeated any of its other competitors – in sheer size and of course, deliciousness.

Deep Dish Apple Pie

This pie is made in a springform pan instead of a regular pie dish, which allows this pie to be deep and the filling to be almost double a normal-sized pie. Because it is such a large pie, it takes quite a while to bake – about an hour and a half – but the wait is more than worth it!

Although it is quite the pie, it isn’t too heavy since the top is just a streusel crumble rather than a second layer of pie crust. I added rolled oats to the streusel because one, I love oats, and two, it gave it an apple crisp twist – which is another apple dessert that I love.

Deep Dish Apple Pie

Deep Dish Apple Pie
Serves 12-16
Recipe from The Smitten Kitchen Cookbook

Pie dough:

Ingredients:
2 1/2 cups all purpose flour
1 tablespoon sugar
1 teaspoon table salt
16 tablespoons unsalted butter, cold and diced
1/2 cup ice cold water

Directions:

1. In the bowl of a food processor, add the flour, sugar and salt and pulse to combine. Add the diced butter and pulse just until you have pea-sized pieces of dough. Transfer to a large bowl.

2. Drizzle the water over the dry mixture and work it together with your hands. Knead briefly then form into a large disk, wrap in plastic wrap and chill for two hours.

Apple pie:

Ingredients:

1 recipe of above pie crust

Filing:
4 lbs apples, 1/2 green apples and 1/2 Fuji apples
1 tablespoon freshly squeezed lemon juice
1 cup sugar
1/4 cup flour
1/2 teaspoon table salt
1 teaspoon ground cinnamon
1/4 teaspoon nutmeg

Streusel topping:
3/4 cups sugar
1/4 teaspoon cinnamon
1/4 teaspoon table salt
1 cup all purpose flour
3/4 cups rolled oats
1 teaspoon baking powder
6 tablespoon butter, melted

Vanilla ice cream

Directions:

1. Prepare crust: coat a 9-inch springform pan with oil. On a floured surface, roll out chilled pie crust into a 16-inch round – 1/4 inch think. My trick to getting a rolled out pie crust into the pan is to roll it back over the rolling pin and then slide your arm under it and then you should be able to lift the whole thing up and transfer it to the springform pan! Trim the overhang to one inch, crimp edges and then place the dish into the fridge while you prepare the apples.

2. Preheat oven to 375 degrees. Peel, core and chop apples into bite-sized pieces. Place them all into a large bowl and drizzle with the lemon juice. In a separate small bowl, whisk the sugar, flour, salt, cinnamon and nutmeg and then mix into apples.

3. Spoon apples into prepared crust and spread them as flat and evenly as possible. Bake pie for 30 minutes (if the tips of the apples begin to brown and burn, cover the top with foil).

4. While pie is baking, make the streusel topping. In a medium bowl, stir together sugar, cinnamon, salt, flour, oats and baking powder. Pour in the melted butter and mix to combine. Stick in freezer until pie has baked for 30 minutes.

5. After 30 minutes, remove the pie from the oven, decrease the oven temperature to 325 and then spoon the streusel onto the top of the pie – pressing gently into apples. Return to the oven and bake for an additional hour. Cover with foil if the streusel begins to brown too quickly.

6. When the pie has finished baking, remove it from the oven and let cool to lukewarm. Run a knife around the crust to loosen the edges from the pan. Carefully loosen the clamp on the springform and slide it over the top and off the pie. The pie slices best when chilled in the fridge, but warm pie and ice cream just can’t be beat. Take your pick and enjoy this tall and proud creation!

Filed Under: Desserts, Thanksgiving Tagged With: Apples, Desserts, Pie

Lemon Couscous Salad with Asparagus and Tomatoes

May 15, 2013 by Mackenzie

I made this salad to go along with the caprese grilled chicken on Saturday night from my last post. My family and I love asparagus so this was a fun, new way to serve it. The lemon juice made it light and summery and the fresh asparagus and tomatoes helped cap off this healthy side dish.

IMG_0294

Ingredients:
6 oz whole wheat pearl couscous
3/4 lb thin asparagus spears, tough ends snapped off
1 tomato, diced
1/4 cup red onion, minced
1 large lemon, juiced
1 tablespoon extra virgin olive oil
2 tablespoons fresh parsley, minced
Salt and Pepper to taste

Directions:
1. Boil a large pot of salted water. Add asparagus and cook until tender, 3-4 minutes. Using tongs, remove the asparagus from the water and in a strainer, run cold water over them to stop them from cooking.

2. Cook couscous according to package directions. Drain and rinse under cold water when finished cooking.

3. While couscous is cooking, chop the asparagus into 1/2 inch pieces. Add the tomatoes. Add the cooked couscous, red onion, lemon juice, olive oil, parsley and salt and pepper. Mix it up and then refrigerate for 15 minutes or until chilled. You can serve it room temperature, but I liked it best chilled.

Filed Under: Healthy, Salads, Sides, Summer Tagged With: asparagus, couscous, lemon, Salads, side dish, tomatoes

« Previous Page
Next Page »

Meet Mackenzie

Hi! I'm Mackenzie! I'm currently a Fulbright English Teaching Assistant in Indonesia! I'm writing all about my year on this blog and hope you'll follow along on this journey! Read More…

Disclaimer:

Students and Indonesian Friends: Please don't take anything I say here as critical of my experience or you and your culture. Rather, through this blog I want to share my experience in your country with my friends and family in America! I may write and laugh about a lot of things that are different but none of it is bad, it's just different!

This blog is not an official Department of State website, and the views and information presented here are my own and do not represent the Fulbright Program or the Department of State.

My Latest Posts on Instagram

[instagram-feed]

My Latest Reads

My Latest Reads

Between the World and Me
5 of 5 stars
Between the World and Me
by Ta-Nehisi Coates
If You Follow Me: A Novel
3 of 5 stars
If You Follow Me: A Novel
by Malena Watrous
The Goldfinch
4 of 5 stars
The Goldfinch
by Donna Tartt
Missoula: Rape and the Justice System in a College Town
4 of 5 stars
Missoula: Rape and the Justice System in a College Town
by Jon Krakauer
Station Eleven
4 of 5 stars
Station Eleven
by Emily St. John Mandel
Fight Back and Win
2 of 5 stars
Fight Back and Win
by Gloria Allred

goodreads.com

Archives

  • August 2017 (1)
  • June 2017 (2)
  • March 2017 (1)
  • February 2017 (1)
  • January 2017 (1)
  • December 2016 (1)
  • November 2016 (3)
  • October 2016 (3)
  • September 2016 (2)
  • August 2016 (2)
  • June 2016 (1)
  • May 2016 (3)
  • April 2016 (1)
  • March 2016 (4)
  • February 2016 (2)
  • January 2016 (1)
  • December 2015 (3)
  • November 2015 (2)
  • October 2015 (4)
  • September 2015 (5)
  • August 2015 (6)
  • June 2015 (2)
  • March 2015 (1)
  • December 2014 (4)
  • November 2014 (3)
  • October 2014 (3)
  • September 2014 (4)
  • August 2014 (5)
  • July 2014 (4)
  • June 2014 (2)
  • April 2014 (1)
  • March 2014 (4)
  • February 2014 (1)
  • January 2014 (3)
  • December 2013 (5)
  • November 2013 (3)
  • October 2013 (1)
  • September 2013 (4)
  • August 2013 (3)
  • July 2013 (2)
  • June 2013 (6)
  • May 2013 (6)
  • April 2013 (6)
  • March 2013 (3)
  • February 2013 (7)
  • December 2012 (10)
  • November 2012 (4)
  • October 2012 (1)
  • September 2012 (3)
  • July 2012 (3)
  • June 2012 (5)
  • May 2012 (18)

Mackenzie

Hi! I'm Mackenzie! I'm currently a Fulbright English Teaching Assistant in Indonesia! I'm writing all about my year on this blog and hope you'll follow along on this journey! Read More…

A Look Back

Mexican Chicken Quinoa Casserole - this is an EASY, HEALTHY casserole that your whole family will love!
Pumpkin Spice Biscotti
This blog is not an official U.S. Department of State website and the views and opinions expressed here are entirely my own, and do not represent the U.S. Department of State or the Fulbright Program.

Copyright © 2025 · Foodie Child Theme by Shay Bocks · Built on the Genesis Framework · Powered by WordPress