The Year of Living Audaciously

Former food blog, now travel blog - following my year as a Fulbright ETA in Indonesia

  • Home
  • About Me
    • Travels and Life Updates
    • Privacy Policy
  • Fellow Fulbrighters
  • Never Skip Dessert
    • Recipes By Category
    • Recipe Index
    • The Best of the Best
    • The Social Kitchen Project
  • Recommended

Archives for May 2012

Grilled Peach Salad with Mozzarella and Arugula

May 23, 2012 by Mackenzie

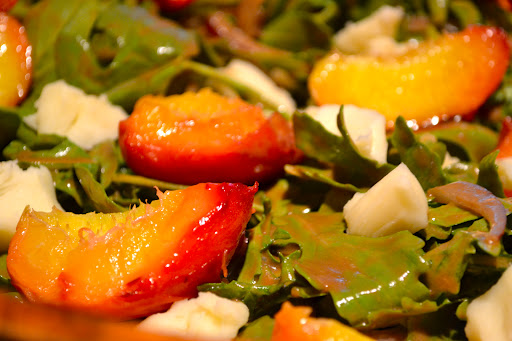
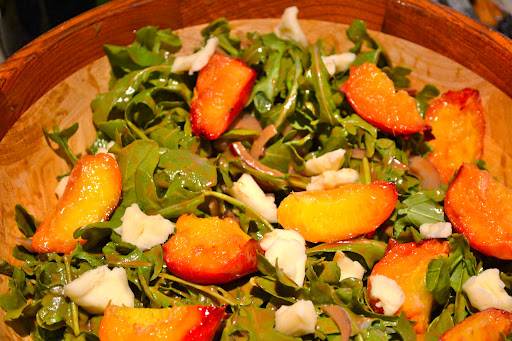
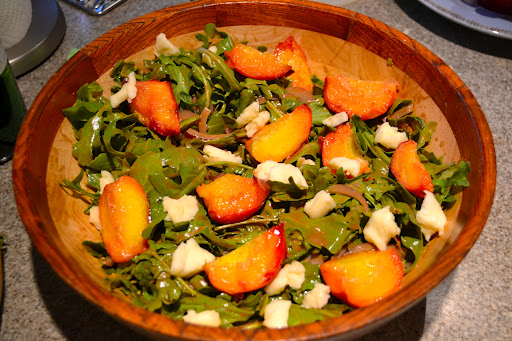
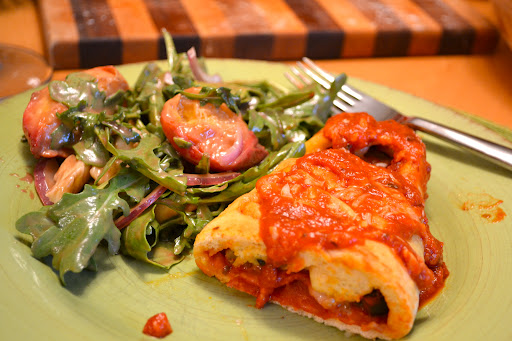
This is probably the best salad I have ever had. Grilling the peaches and nestling them into this salad with fresh mozarrella makes for a sweet but fresh and summery salad. You have got to make this!


Grilled Peach Salad with Mozzarella and Arugula
Serves 6
(Recipe from Farmhouse Table)
 
6 peaches, cut in half and pitted
Salt
3-4 large handfuls arugula, washed and dried
1 small red onion, slivered (We just used 1/2)
5 oz. buffalo mozarella or other fresh mozzarella, torn into bite-size pieces 
4 Tbs. white balsamic vinegar
2 tsp. honey
2 tsp. dijon or whole grain mustard
2 Tbs. minced chives
1/3 C olive oil
2 Tbs. creme fraiche or 1 Tbs. heavy cream
1/2 cup pecans
Coarse sea salt to sprinkle on top
 
1. There are two ways you can grill the peaches. One way is to do it on a barbecque, the other way – use a George Foreman or something similar if you have one. We used a George Foreman because it was raining outside and we didn’t want to be cold and wet. However, if you do use a grill, light a fire in grill and let it burn down to medium hot – or turn on the george foreman :D. 
 
Lighly salt the cut sides of the peaches and drizzle very lightly with olive oil and place cut side down on the grill. 
 
 
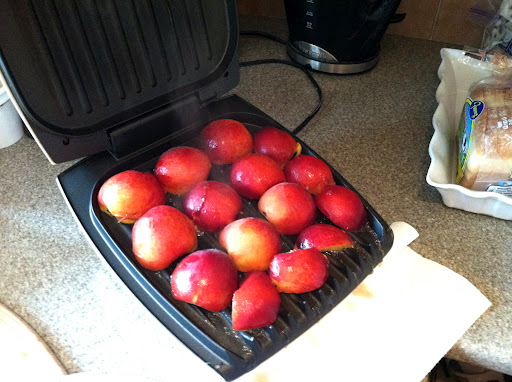
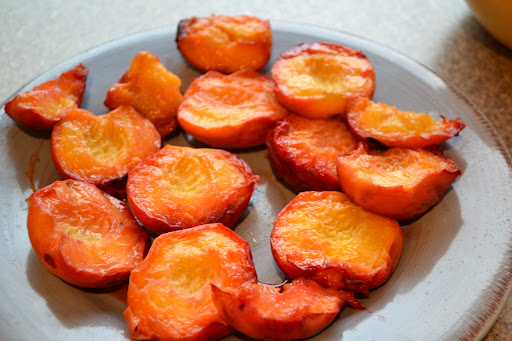
When the peaches are charred and just beginning to soften, remove, place on a platter and set aside. 


Make the dressing: place vinegar, honey, mustard and chives in a small bowl. While whisking constantly, slowly drizzle in olive oil until emulsified. Whisk in the creme faiche or cream.
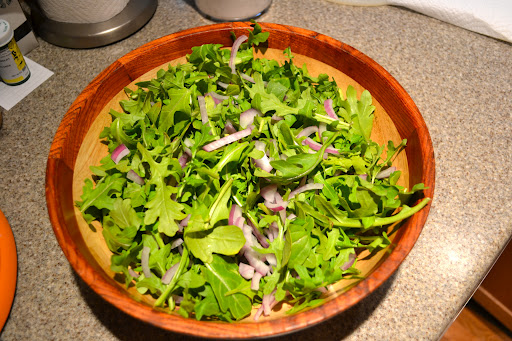
Toss arugula, onion and pecans with vinaigrette and place on serving platter or bowl.


Nestle peaches and mozzarela amongst greens and drizzle with a little more dressing. Sprinkle with coarse sea salt and serve.


Filed Under: Salads, Sides

Perfect Pizza Sauce

May 23, 2012 by Mackenzie

Check out my previous post for homemade calzones! We made our own pizza sauce and it was delicious! I highly recommend making your own pizza sauce next time you make pizza!

Perfect Pizza Sauce
(Recipe from Life’s Ambrosia)
1 (14.5 oz.) can tomato sauce
2 Tbsp. tomato paste
1 garlic clove, finely minced
1/2 tsp. dried basil
1/2 tsp. dried oregano
1/4-1/2 tsp. crushed red pepper, depending on how much spice you like
1/4 tsp. salt
1/4 tsp. cayenne pepper
1/8 tsp. sugar
1/8 tsp. allspice
Combine all ingredients in a small saucepan. Cook over medium heat until it starts to bubble slightly, about five minutes. Reduce heat and let simmer for 15-20 minutes. Done!


Filed Under: Pizza

Braided Calzones

May 23, 2012 by Mackenzie

The other night we had a bunch of family in town and so my uncle and I made calzones! It was a fun way to make a classic meal but be able to customize it for each family member! 

We used homemade pizza dough and a homemade pizza sauce and they were both fantastic! 


Here is the recipe for the dough… I’ll post our pizza sauce in the next post!
And don’t worry about how complicated it looks to braid them like this! I’m including step by step pictures and I promise it really isn’t all that hard!


Braided Calzones

Calzone Dough
(Recipe Adapted from Allrecipes.com and Amy’s Cafe)

Makes four personal-size calzones or one large calzone.


1 C lukewarm water

1 pkg. active dry yeast

1 tsp. salt

1/2 tsp. sugar

1 tsp. dry milk powder
3 C bread flour
3 Tbsp. olive oil (aprox.) plus more for drizzle
1 egg (beaten)
2 tsp. water
In the bowl of a stand mixer, combine the water, yeast, salt and sugar and stir to combine. Set aside for 15 minutes and then stir in (with dough hook attachment) the dry milk powder, flour and olive oil and mix until a dough forms. Turn onto a floured surfact and knead for ten minutes (seriously, knead it for that long!). The dough should feel smooth and elastic. Drizzle olive oil over outside of dough to cover and place in a lightly oiled bowl. Cover and place in a warm place for 1-2 hours – or until doubled in size.
Beat down the dough and split into four balls. Place into a 9×13, cover, and let rise again for 15 minutes.
Roll out each ball of dough on a lightly floured surface and shape into a rectangle. 

Side tip: When I rolled out the dough… it helped to become a professional pizza thrower and toss my dough! ha!

Transfer to a cookie sheet, especially if you are doing one giant one. Spoon pizza sauce (check out next post for homemade pizza sauce recipe) onto the middle of the calzone and then top with your favorite pizza toppings (pepperoni, sausage, red onions, red peppers, black olives, mushrooms…)  

and finally cover with cheese! Now for the braiding part: using a sharp knife, make diagonal cuts one inch apart, down both long sides of the rectangle. Don’t cut all the way to the fillings. 


To wrap it up, fold up the bottom and starting at the bottom and alternating sides, overlap the strips of dough onto the filling in a lattice pattern. Stretch the pieces all the way to the other sides and tuck the strips underneath the filling. Pretend you are wrapping up a baby!


The above picture is what happens if you cut the strips too close to the filling – the filling will kind of burst out of the dough. 

And ta da! (At the top, just kind of do the same and fold it over and tuck it all in… I haven’t found a good way to end it yet)

Brush calzone with an egg wash (1 egg beaten with 2 tsp. water). And bake at 375 degrees for 20 (several small calzones) or 30 (one large calzone) minutes. 

We topped the calzones with the leftover pizza sauce so add even more flavor 🙂 


Filed Under: Dinner, Pizza

Chicken and Black Bean-Stuffed Burritos

May 17, 2012 by Mackenzie

We had some leftover chicken from our BBQ this past weekend and so I scrolled through my pinterest boards to find something new and fun to do with it. I got the okay from Spencer to make these (big deal! haha!) and they turned out great! A quick and easy meal!


Chicken and Black Bean-Stuffed Burritos
(Recipe from My Recipes)

 Makes 4 burritos

  • 1/4 cup water
  • 2 tablespoons fresh lime juice
  • 1/2 teaspoon chili powder
  • 1/4 teaspoon ground cumin
  • 1/4 teaspoon black pepper
  • 1/8 teaspoon ground red pepper
  • 2 cups shredded rotisserie chicken breast 
  • 1/4 cup thinly sliced green onions 
  • 3/4 cup canned black beans, rinsed and drained
  • 1/2 cup refrigerated fresh salsa 
  • 4 (8-inch) flour tortillas 
  • 1/2 cup shredded Monterey Jack cheese
  • Cooking spray 

  1. 1. Bring first 6 ingredients to a boil in a small saucepan. Stir in shredded chicken and green onions.
  2. 2. Combine beans and salsa. Spoon 1/4 cup bean mixture and 1/2 cup chicken mixture down center of each tortilla; sprinkle with 2 tablespoons cheese. Roll up.
  3. 3. Heat a large skillet over medium-high heat. Coat pan with cooking spray. Add 2 burritos. Place a cast-iron or other heavy skillet on top of burritos, and cook for 3 minutes on each side. Remove from pan, and repeat procedure with the remaining 2 burritos.

Filed Under: Dinner, Easy, Mexican

Peanut Butter S’mores Bars

May 17, 2012 by Mackenzie

At Spencer’s request I made these yummy bars 🙂 They were very easy and quite delicious! 

Peanut Butter S’mores Bars
(Recipe from The Sweet Life)


Makes: 16 large/20 small squares

  • 1/2 cup butter, softened
  • 1/2 cup packed brown sugar
  • 1/4 cup sugar
  • 1 egg
  • 1 teaspoon vanilla
  • 1 1/4 cups flour
  • 1 teaspoon baking powder
  • 1/4 teaspoon salt
  • 1 cup graham cracker crumbs
  • 16 peanut butter cups, regular size
  • 1 1/2 cups marshmallow fluff
  1. Preheat the oven to 350 degrees.  Line an 8×8 baking dishing with parchment paper; coat lightly with cooking spray (don’t forget the sides).
  2. In a large bowl of the bowl of stand mixer, beat butter and sugars until fluffy.  Beat in egg and vanilla until combined.  Scrape down the sides.  With the mixer on low, stir in the flour, baking powder, salt, and graham cracker crumbs until mixed.
  3. Spread 2/3 of the dough on the bottom of the prepared baking dish.  Lightly press the peanut butter cups into the dough, then spread marshmallow fluff on top.  Press the remaining dough on a non-stick surface into the shape of an 8×8 square.  Place the square on top of the fluff and press down lightly.
  4. Bake for 25-30 minutes or until the edges just begin to brown.  Allow to cool for at least two hours* to give the bars a chance to set, then remove from the pan and cut into squares with a large, sharp knife.


*We only let them sit for an hour or so because we were too hungry 🙂 They were great warm but also very good the next day once they had set in the refridgerator.

Filed Under: Bars, Desserts

Strawberry Shortcakes with Lemon Cream

May 13, 2012 by Mackenzie

Made these for our first BBQ of the summer! They were delicious! A perfect summer dessert!


Strawberry Shortcakes with Lemon Cream
(Recipe from Food and Wine Magazine)


Recipe says it makes 6 – but it made 8 for me. Granted mine were probably smaller than the recipe called for. 

BISCUITS

  1. 1 1/2 cups all-purpose flour, plus more for dusting
  2. 3/4 cup cake flour
  3. 3 tablespoons sugar
  4. 2 teaspoons baking powder
  5. 1/2 teaspoon salt
  6. 6 tablespoons cold unsalted butter, cubed, plus 1 1/2 tablespoons melted butter
  7. 1 cup heavy cream
  8. 1 1/2 tablespoons turbinado sugar (buy it – it’s totally worth it! Makes them really good!)

LEMON CREAM

  1. Finely grated zest of 1 lemon
  2. 1/4 cup fresh lemon juice, preferably from Meyer lemons
  3. 2 1/2 tablespoons sugar
  4. 1 large egg
  5. 1 large egg yolk
  6. Pinch of salt
  7. 3 tablespoons unsalted butter
  8. 1 cup heavy cream

STRAWBERRIES

  1. 2 pints strawberries, quartered
  2. 2 tablespoons sugar
  1. Preheat the oven to 375°. In a large bowl, whisk the all-purpose and cake flours with the sugar, baking powder and salt. Using a pastry blender or 2 knives, cut in the cold butter until it is the size of small peas. Stir in the cream until a shaggy dough forms.
  2. Turn the dough out onto a very lightly floured surface and knead 2 or 3 times, just until it comes together. Roll the dough into a 7-inch round, about 3/4 inch thick. Using a 2 3/4-inch or 3-inch biscuit cutter (or a cup!), stamp out 5 biscuits. Gently gather the scraps and reroll them; cut out 1 more round so you have a total of 6 biscuits.
  3. Transfer the biscuits to a baking sheet and brush with the melted butter. Sprinkle the turbinado sugar on top and bake for 25 to 30 minutes, until the biscuits are golden. Let cool.
  4. Set a strainer over a medium bowl. In a small saucepan, combine half of the lemon zest with the lemon juice, sugar, egg, egg yolk, salt and 1 tablespoon of the butter. Cook over moderate heat, whisking constantly, until thickened, about 5 minutes. Immediately strain the curd into the bowl. Whisk in the remaining lemon zest and 2 tablespoons of butter. Press plastic wrap directly onto the surface and refrigerate until cool, about 15 minutes.
  5. In a medium bowl, softly whip the cream. Fold the lemon curd into the whipped cream and refrigerate for at least 15 minutes.
  6. In a medium bowl, toss the strawberries with the sugar and let stand for 15 minutes.
  7. Split the biscuits in half and arrange the bottom halves on plates. Mound the lemon cream on the biscuits, top with the strawberries and their juices and replace the tops. Serve right away.
MAKE AHEAD The biscuits can be stored in an airtight container overnight. Recrisp them in a warm oven and let cool before serving. The lemon curd can be refrigerated for up to 2 days. The lemon cream can be refrigerated for up to 2 hours.

Filed Under: Desserts, Summer

« Previous Page
Next Page »

Meet Mackenzie

Hi! I'm Mackenzie! I'm currently a Fulbright English Teaching Assistant in Indonesia! I'm writing all about my year on this blog and hope you'll follow along on this journey! Read More…

Disclaimer:

Students and Indonesian Friends: Please don't take anything I say here as critical of my experience or you and your culture. Rather, through this blog I want to share my experience in your country with my friends and family in America! I may write and laugh about a lot of things that are different but none of it is bad, it's just different!

This blog is not an official Department of State website, and the views and information presented here are my own and do not represent the Fulbright Program or the Department of State.

My Latest Posts on Instagram

[instagram-feed]

My Latest Reads

My Latest Reads

Between the World and Me
5 of 5 stars
Between the World and Me
by Ta-Nehisi Coates
If You Follow Me: A Novel
3 of 5 stars
If You Follow Me: A Novel
by Malena Watrous
The Goldfinch
4 of 5 stars
The Goldfinch
by Donna Tartt
Missoula: Rape and the Justice System in a College Town
4 of 5 stars
Missoula: Rape and the Justice System in a College Town
by Jon Krakauer
Station Eleven
4 of 5 stars
Station Eleven
by Emily St. John Mandel
Fight Back and Win
2 of 5 stars
Fight Back and Win
by Gloria Allred

goodreads.com

Archives

  • August 2017 (1)
  • June 2017 (2)
  • March 2017 (1)
  • February 2017 (1)
  • January 2017 (1)
  • December 2016 (1)
  • November 2016 (3)
  • October 2016 (3)
  • September 2016 (2)
  • August 2016 (2)
  • June 2016 (1)
  • May 2016 (3)
  • April 2016 (1)
  • March 2016 (4)
  • February 2016 (2)
  • January 2016 (1)
  • December 2015 (3)
  • November 2015 (2)
  • October 2015 (4)
  • September 2015 (5)
  • August 2015 (6)
  • June 2015 (2)
  • March 2015 (1)
  • December 2014 (4)
  • November 2014 (3)
  • October 2014 (3)
  • September 2014 (4)
  • August 2014 (5)
  • July 2014 (4)
  • June 2014 (2)
  • April 2014 (1)
  • March 2014 (4)
  • February 2014 (1)
  • January 2014 (3)
  • December 2013 (5)
  • November 2013 (3)
  • October 2013 (1)
  • September 2013 (4)
  • August 2013 (3)
  • July 2013 (2)
  • June 2013 (6)
  • May 2013 (6)
  • April 2013 (6)
  • March 2013 (3)
  • February 2013 (7)
  • December 2012 (10)
  • November 2012 (4)
  • October 2012 (1)
  • September 2012 (3)
  • July 2012 (3)
  • June 2012 (5)
  • May 2012 (18)

Mackenzie

Hi! I'm Mackenzie! I'm currently a Fulbright English Teaching Assistant in Indonesia! I'm writing all about my year on this blog and hope you'll follow along on this journey! Read More…

A Look Back

5 EASY, Healthy Recipes for College Students!
This blog is not an official U.S. Department of State website and the views and opinions expressed here are entirely my own, and do not represent the U.S. Department of State or the Fulbright Program.

Copyright © 2025 · Foodie Child Theme by Shay Bocks · Built on the Genesis Framework · Powered by WordPress